Learning to Quilt: My First Project
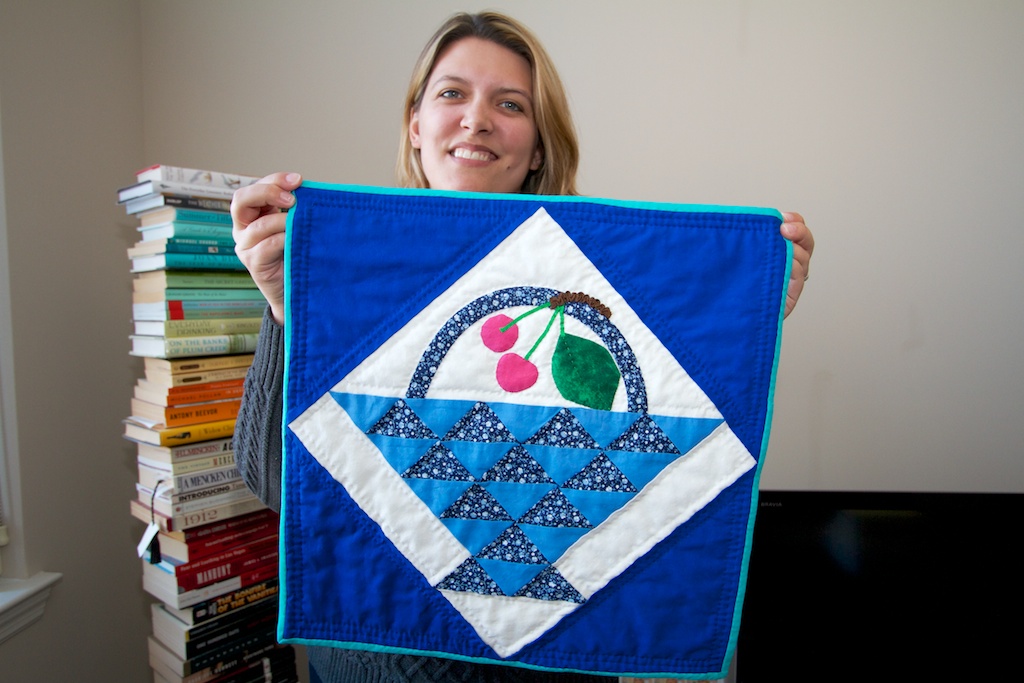
My adventures in quilting started when I signed up for a class offered through the Smithsonian Associates program a couple of months ago. Why quilting? Why now? I can’t really explain it, except that I was eager for a creative challenge and saw it as a way to connect with the past.
I wasn’t expecting to fall in love.
Now, I’ve only taken one class (a three-session course taught by the phenomenal Jeanne Benson, a truly inspiring artist) and I’ve only finished one project. So maybe it’s just an infatuation. But if you’re considering a fling with fabric yourself, here’s an overview of what I’ve learned so far:
 Step One: Piecing
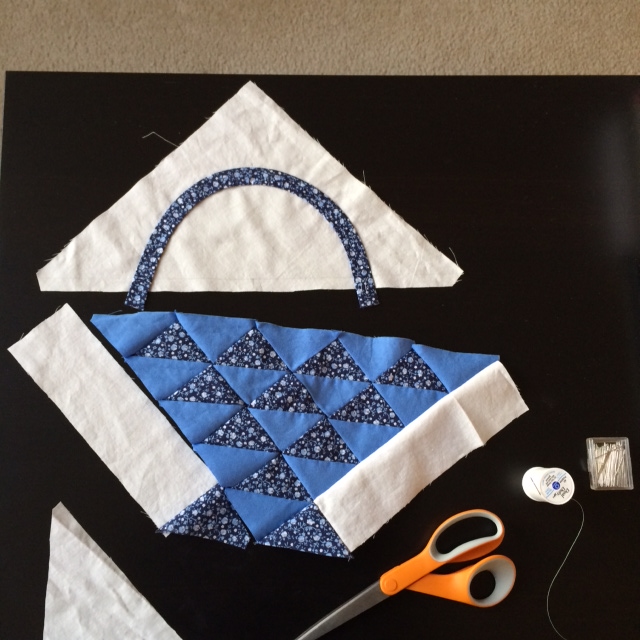
After an introduction to working with fabrics and using templates, the first thing we learned was piecing. We used a simple running stitch to put together all those little triangles that make up the basket. One minor stumbling block I faced early on was that it was hard to mark where the stitches should go on the flower-patterned fabric I used. Tailor’s chalk finally did the trick!
I thought piecing was fairly straightforward, though it could be tricky when lots of corners came together. My biggest problem was that my stitches were a bit too loose!
 Step Two: Appliqué
The handle of the basket, the cherries and the (in my case, rather misshapen) leaf were all added using an appliqué stitch. I found this part particularly difficult.
For appliqué, your stitches need to be hidden in a fold so they’re (ideally) invisible to the eye. We learned several different techniques for making our shapes and stitching them on. I found I was much better with the handle, which we folded in thirds before sewing, than trying to use the needle-turn technique, in which you fold the fabric under as you go. (Hello, blobby leaf!)
 Step Three: Quilting
Before my class, I had no idea that “quilting” referred to a specific part of the quilt-making process — in other words, there’s a lot more to quilting than quilting!
The easiest way to explain it is to ask you to picture both regular toilet paper and quilted toilet paper. You know how the quilted stuff has raised parts and texture? That’s what the quilting part of quilting is all about.
Once the top layer was pieced together and the appliqué finished, the next step was to cut out a layer of cotton batting (stuffing) and a backing fabric. Then we used stitches through all three layers to create the amazing texture that makes a quilt much more than a blanket.
 Step Four: Binding
Binding is by far the most daunting part of the project in my view, given that it combines both the appliqué stitch and math! Luckily, in this case, my instructor had already calculated exactly how much bias binding we needed to create. (Making the binding involved drawing a lot of lines on a piece of fabric, sewing the sides together to make a tube and then magically cutting it into one long strip.)
Once the long strip of binding was ready, sewing it to the front of the project was easy. The hard parts for me were using the appliqué technique to hide the stitches in the back and making the corners. I ended up with crooked lines and somewhat squishy corners, but that just makes it look homemade, right?
Making this first project was really satisfying. Because a quilting project goes through so many different stages and uses multiple techniques, I find it more mentally engaging than other needlework I’ve done (mostly knitting scarves and cross-stitching). I have a feeling that this first rush of love is only the beginning.

Congratulations on your first project! I’m glad you enjoyed it. If you do more, one thing you’ll find is there are MANY ways to do a lot of the things you did right here. Machine piecing and applique AND quilting, straight-grain binding, and within those, lots of methods for the same ends, too. Looks like you did great. I hope you have a lot of fun with it in the future.
Thank you!
Nice work! So cool you found a creative passion. I didn’t know you had this blog — yay for blogs! Yay for me getting follow you! 🙂
Ha! Now I just need to, y’know, actually make another quilt. I have the stuff for one; just need to find the time!